Kirsten A. Harr Photography Blog
|
Some of the links on this website are affiliate links, which means that I may earn a commission if you click on the link or make a purchase using the link. When you make a purchase, the price you pay will be the same whether you use the affiliate link or go directly to the vendor's website using a non-affiliate link. By using the affiliate links, you are helping support Kirsten A. Harr Photography, and I genuinely appreciate your support.
|
|
To all the mamas of new babies, here's a beautiful idea for you. Capture your little one's growth from newborn to 12 months in two classic black and white photographs. Your photographs will be an heirloom you can pass on for generations. And you know the bonus of taking photos like this? YOU will be in the photo too!  {Source: Munchkins & Mohawks} But you know what?? Even if you missed doing this when your kiddo was young, don't resign yourself to a hefty case of the FOMO (fear of missing out), you can really do this for your child(ren) at any age! Capturing the transformation of growth through portraits isn't reserved for babies.  {Source: Kirsten A. Harr Photography} Okay, so do you love this idea, or is it just me? Let me know what you think in the comments below, I'd love to hear from you!
0 Comments
Do you remember the "old days" when you'd take a photograph and you'd have NO clue what it looked like until you had your roll of film developed? There was some excitement and anticipation about the photos you captured through your camera. Like: "were they any good?" Hahaha. Back in the day, you HAD to have the photo developed/printed to know what it looked like. And with a printed image, we were way more inclined to to put in an album or a frame. Today is much different. We get instant results. Digital cameras certainly help us to cut down on clutter and thousands of 4x6 printed photos stored in keepsake boxes. But, I have a question for you.... When's the last time you took a photograph, printed it off, and displayed it in your home? Sure, digital cameras are awesome, but if we're honest, digital cameras also make it easy for us to take photos and leave them stored in our phones, computers, or cameras never to be seen or enjoyed ever again. We no longer have to print photos to know what they look like or to share them with loved ones. I'm a culprit of "failing to print" as well. I have thousands of photos captured in my phone, on my computer, and on memory cards, but now I'm finding ways to get them printed and displayed so my family can enjoy them now, and for years to come. Here are 4 fun ways you can display photographs in your home. 1. A Giant Framed Collage Take a bunch of your photos and turn them into a giant poster collage and frame it. It's a clean look to display a bunch of photos in on place. You can have a theme for your collage--or not. It's all up to you! {Photo Credit: Pinterest} 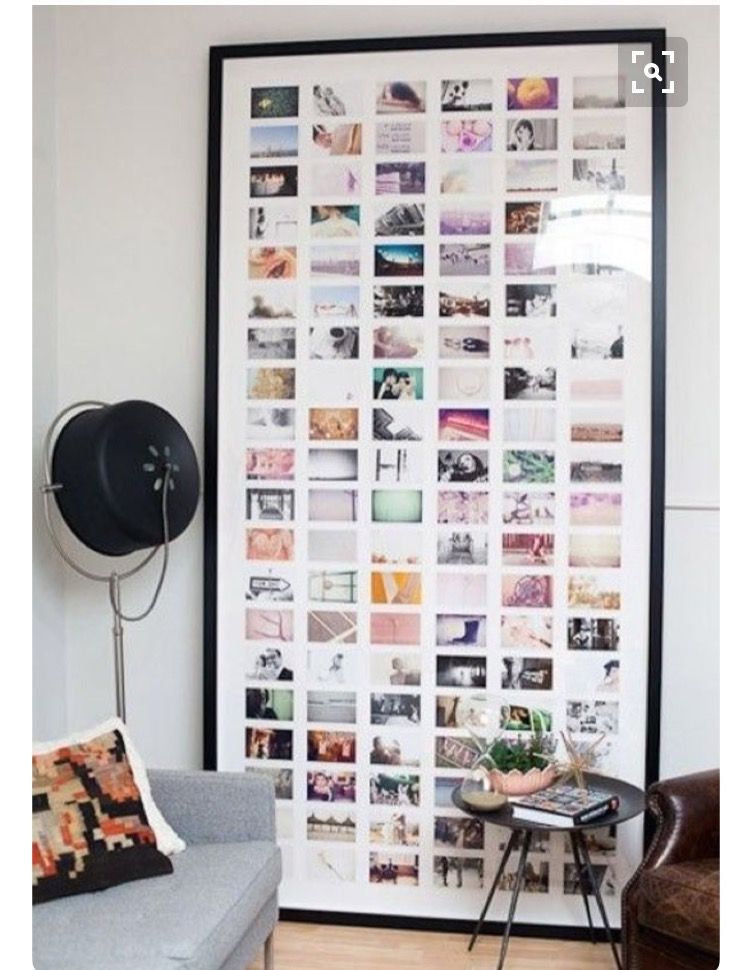 2. Frames Multiplied Individually frame your photos and layer them on floating shelves. Want a little tip on how to get lots of frames at a great price? Check your local thrift stores. Some frames come with images in them, take them out and put yours in--this way you can get lots of frames at a low price! {Photo Credit: Lenore-Nevermore} 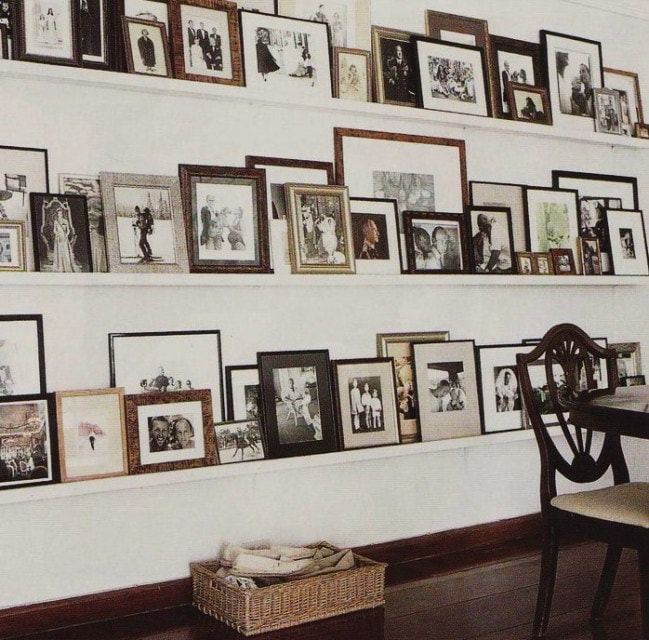 3. Swappable Clipboard Displays Hang up a few clipboards (or as many as you want) to display your photos. This is pretty clever--the photos can be swapped in and out really quick! {Photo Credit: Danielle Hatcher} 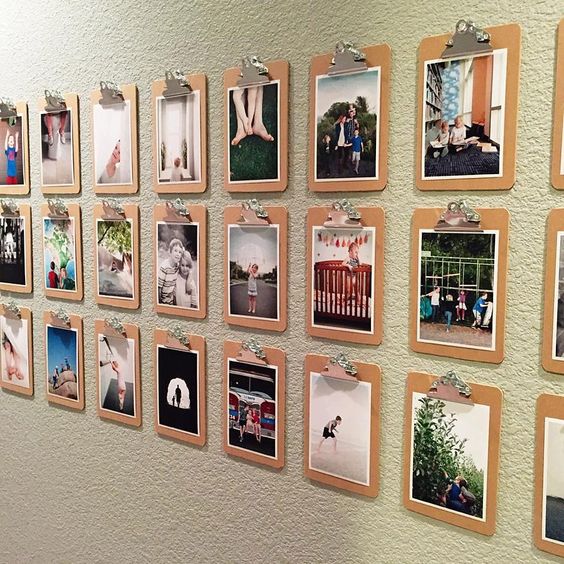 4. Customized Photo Book This is a great way to get a lot of photos off of your digital devices. We have our books on a coffee table in our living room so they can be enjoyed at any time. We often find guests perusing through the albums. It's a fun way to relive and remember our experiences. {Photo Credit: Artifact Uprising}  Let's let our pictures see the light of day & get them printed and displayed. This list is obviously not exhaustive. There are way more than 4 fun ways to display photographs in your home. Do you do something I haven't listed? Please share in the comments--I'd love to hear from you!
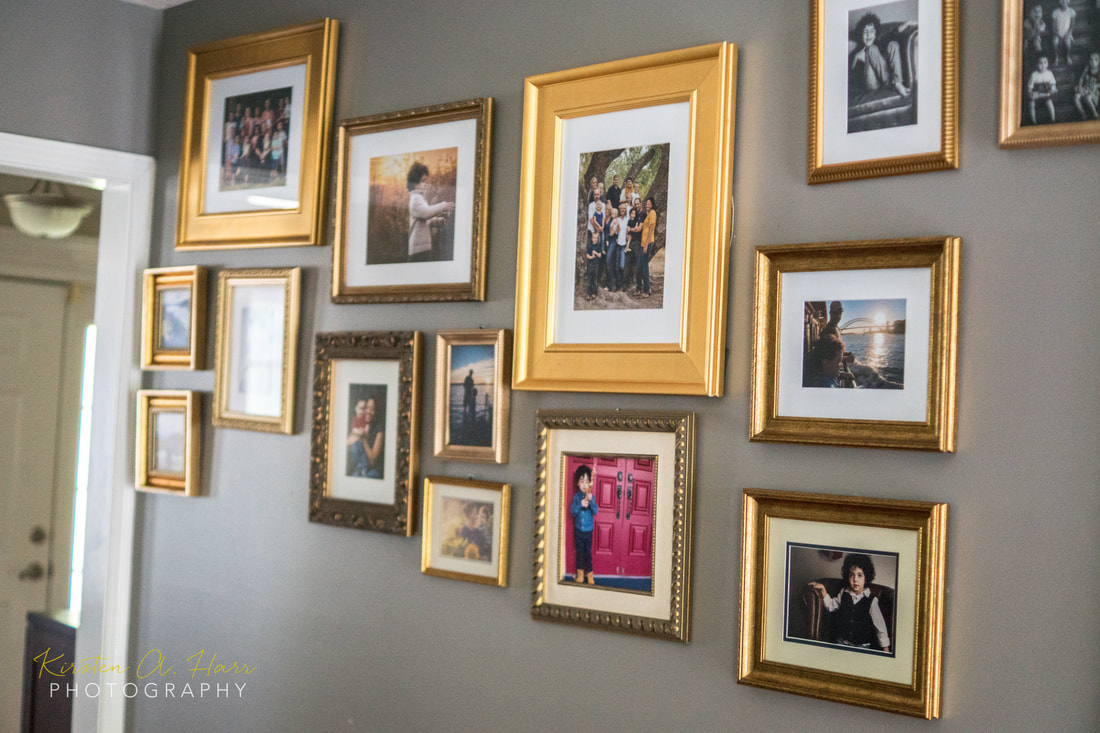 You get beautiful images from portrait sessions or you capture your own photos and post them on social media. The photos get a bunch of likes and comments, and they pop back up in your feed once a year when you're reminded you shared the image "on this day 5 years ago." But, maybe there's more you can do with those gorgeous photographs... Quick question for you. How many empty walls do you have in your home? Okay, one more question. Are the walls empty by choice, or are they empty because you're not sure what to hang on them? If you're just not sure what to hang on your walls, I want to take some time to encourage you decorate those babies with photos of the ones you love. Art can be expensive & tastes change, but one style that can and will stand the test of time are photographs of the ones you love. Maybe you're interested in having one large portrait of your family beautifully framed to accent the wall in your living room. Or maybe you'd prefer to have a collection of framed images (as pictured above). There's no right or wrong answer there. Just have fun, capture those memories, and use them to decorate your home. Seeing your family's portraits on the wall every morning while you get ready for the day will bring you so much joy. It's worth it! If you're in need of updated portraits for your family to adorn your walls, click here to schedule a complimentary consultation. I'm here for you! Until Next Time,   Traveling with photography gear can be tricky. With a camera (or two), a few lenses, a flash, filters, batteries, memory cards, and a handful of other peripherals, you end up walking around with a bag full of fragile items that are at an increased risk of getting bumped or dropped. Sadly, even minor bumps and drops can negatively affect the performance of lenses and create all kinds of problems which includes a very common problem: the decentering of lens elements.
A decentered lens occurs when one or more optical lens elements move or tilt away from the principal axis of the lens. This kind of movement can cause a shift in light rays which reduces sharpness and blurs parts of the image. If your lens is severely decentered, it could blur the entire image. So, what do you do if you suspect you have a decentered lens? The easiest, and most cost effective way of testing your lens for decentering is to shoot very fine detail at infinity by following these steps: Step 1: Make sure that both the front and the rear lens elements are clean. Step 2: Find some trees or anything with very fine detail located relatively far away from you so you can focus at infinity. Step 3: Frame your camera so that the details cover the entire frame or at least cover from bottom left to bottom right of the frame. Step 4: Set your lens to maximum aperture (around f/1.4). Step 5: Focus on the center of the area that contains the fine detail using live view. Step 6: Take a picture. Step 7: If the fine detail does not cover the entire frame (or the bottom two corners at a minimum), then reframe your shot and take another picture. Step 8: Analyze images at 100% on your computer. Focused at infinity, the area that you focused on is going to be sharp. Now look at the fine details from the left to the right side of the frame. The extreme corners should be very similar on both sides (either similarly sharp or similarly blurry). If one side is sharp and the other is noticeably blurry, you have a decentered lens. If you don’t have a decentered lens, commence celebration by gently placing your lens back in its protective case. If you do have a decentered lens, it’s not the end of the world--but whatever you do, don’t try to open the lens and fix it on your own, as it may void the warranty and you could actually make it much worse. If the decentering issue is minor (you can only see a slight blur), you may not want or need to worry about it. But if the decentering is severe (you see a heavy blur), you may want to repeat the test with apertures you’re more likely to use. If the blur is still noticeable with different apertures, you probably want to return the lens (if possible) or get it serviced by an accredited professional. Happy Snapping! Kirsten  If you’ve ever considered traveling to Iceland to photograph aurora borealis (also known as the Northern Lights), there is one crucial thing you should know before going: aurora borealis is quite elusive and unpredictable—even in Iceland. Even if you visit Iceland between September and April, when your chances of catching a glimpse the lights is drastically higher, it’s truly a hunt to find the Northern Lights. Aurora borealis is sporadic and completely dependent on the frequency and strength of solar flares that come in contact with the Earth. What does that mean? It means you can’t truly plan the exact moment you’ll see the lights—so, it’s crucial to be fully prepared to capture your photographs at any moment.
To ensure you’re ready to capture star-studded images of the Northern Lights through your lens when you happen upon the right place at the right time, make sure you’re equipped with the right gear. Let’s start with the camera. I recommend using a full frame DSLR with manual mode that can handle an ISO of 3200 to 6400. To capture the perfect pictures of the Northern Lights, you’ll want to be in very low light, avoiding man-made light sources and away from highly populated areas that produce light pollution. Consequently, you’ll want to have your aperture between f/2.8 and f/5.6 and your shutter speed between 15 seconds and 30 seconds. The lights dance in the sky, so the faster the lights are moving, the shorter the shutter speed should be. Because the intensity of the lights and amount of movement is constantly changing, experimenting with settings is important; you will definitely want to have your camera in full manual mode. Depending on the light conditions on the night you’re shooting, be prepared to make adjustments to your settings if your images end up slightly overexposed or underexposed. And let’s not forget about your lens. You’ll want to have something fast with a relatively wide angle. A focal length of 16mm is great, but a 24mm prime lens will work just as well. You will also want a lens that will give you the ability to incorporate the dark night sky for contrast and scale. To get a nice crisp image, remember to take all filters off of your lenses before shooting--including your UV filter. Additional but necessary pieces of equipment to have with you are: a tripod, a remote, and extra batteries. A sturdy tripod and remote will let you shoot long exposures without risk of the camera shaking. I recommend having two to three extra camera batteries. The cold temperatures in Iceland will cause your batteries to drain faster, and you’ll want extra battery life on hand as you wait patiently for the lights to appear. You may also want to consider bringing a headlamp with a red light so you can make adjustments to our camera settings without ruining your night vision. Remember, every interaction with the Northern Lights is unique, which means there’s no “perfect camera setting” to capture them. So, the best way to prepare for your quest to capture the Northern Lights is to practice and hone your nighttime photography skills. A great way to practice is to check out the weather forecast in your local area, pick a clear night, grab your gear, drive to a dark, unlit space (a wide open field will work well), snap pictures of the nighttime sky and prepare for your meeting with the Northern Lights. Happy Snapping! Kirsten  You traveled all the way to the Taj Mahal hoping to capture a quintessential photo of the ivory-white marble mausoleum only to find thousands of tourists exploring right in front of your lens—and that’s not quite the image you were hoping for. There are few things worse for a photographer than being at an amazing location and having other people in the way of your shot. But no need to fret. With this travel photography tip, you can have a beautiful image sans tourists, and you won’t have to spend hours upon hours cloning people out of it. Here’s how you can make tourists disappear in four simple steps: Step 1: Put your camera on a tripod. Step 2: Take a picture about every 10 seconds until you have at least 15 shots, depending on how fast people are walking around. Step 3: Open all the images in Photoshop Extended or the Creative Cloud edition of Photoshop by going to File > Scripts > Statistics. Then choose “median” and select the images you took. Step 4: Voila! Photoshop finds what is different in the photos and simply removes it. Basically, the area where someone was standing is now filled with part of another photo where no one was there.  So before you travel to the Taj Mahal or any of the other wonders of the world, test this technique out in a nearby park or busy area in town to ensure you’re comfortable with all of the steps involved and satisfied with the outcome.
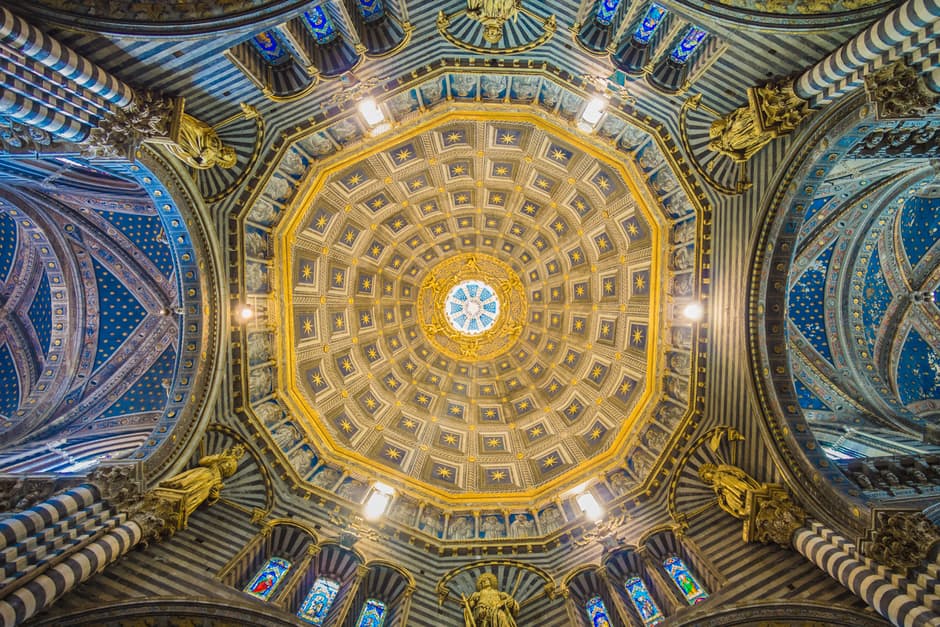  Have you ever walked into an old cathedral or chapel, looked up, and found yourself amazed by the patterns, architecture, lines, colors, light, and frames all perfectly composed for your camera to capture? A grand ceiling is beautiful to behold and photograph. But unless you’re prepared to photograph a grand ceiling, what you see before your eyes may not translate through your lens. Let’s take some time to talk about lighting. Because many older structures are poorly lit, seeing the details in the ceilings may be difficult even for the naked eye. To make sure your camera can pick up the details in dim lighting, you’ll want to use a wide aperture and long exposure time to capture as much light as you can. Also, be mindful of lanterns, windows, and other lighting sources as they can also create sharp contrasts. With different factors at play, be prepared to test multiple settings. Holding the camera in your hands to capture images in low-light settings is not ideal; photographing the spectacular architecture and artwork of a grand ceiling certainly calls for better technique than merely craning your neck back, pointing your camera straight up at the ceiling and snapping away. Not only is this painful for your neck and spine, but you may miss out on capturing all of the intricate details above you in a blurry or dark image. So, try setting your camera on the floor. Yes, on the floor with the lens pointing up. Setting the camera on the floor allows for the widest perspective of the grand ceiling, and you don’t have to worry about setting up a tripod. I also recommend using a wide angle lens for these shots to give your image an even wider field of view with an enhanced perspective. If you’re worried about having your camera on the floor, you can place it on top of a thin non-slip mat for additional cushion and protection. But, there’s a catch. Since you’ll be unable to use the LCD screen or viewfinder with your camera in this position, I highly recommend you tether your camera to your laptop computer with a USB or HDMI cable (depending on your camera’s capabilities). The LiveView function will allow you to see everything in more detail on the larger screen of your laptop which will, in turn, help you find the optimal position, snap the picture, and help you make appropriate camera setting adjustments to capture the image more efficiently. Before you head out to try this technique in a high-traffic cathedral or chapel, practice it at home. Tether your camera to your laptop computer with LiveView function and become familiar with all of the capabilities at your fingertips. With practice, you’ll be able to beautifully capture the ornate grand ceilings waiting for you to photograph all over the world. Happy Snapping! Kirsten  There’s no doubt travel photography can be a challenge. Not only are you traveling to a new (and sometimes distant) location with camera gear, but you’re also at the mercy of whatever conditions are thrown your way. Although you don’t want to pack too much gear while you travel, you still want to be prepared for anything you may face. One way to be prepared for any condition, is to travel with camera lens filters.
With so many technological advances in digital photography, it may be tempting to think that camera lens filters are outdated or even pointless. Many photographers are reliant on the built-in editing tools in Lightroom and Photoshop to replicate or even replace the filter actions of a camera lens filter. Although the photo editing tools we now use are highly developed, lens filters shouldn’t be tossed by the wayside--some filter actions can never truly be replicated with software. Yes, you can achieve many effects with digital editing tools, but some lens filters have the ability to yield effects that would take a considerable amount of time or be near impossible to recreate digitally. Not only that, but some lens filters will enable you to shoot in conditions that could otherwise damage your lens. This creates more opportunities for the travel photographer. Although there are many different lens filters with varying purposes, there are three lens filters you definitely want to have with you while you travel.
While you can’t control the weather, lighting, and other extrinsic conditions when you travel, you can control the equipment you bring with you. Lens filters have the ability to capture images in difficult lighting conditions, enhance colors, reduce reflections, or simply protect lenses. Lens filters can greatly enhance your photographs, but it’s important to use them properly and only when necessary to avoid jeopardizing your image quality. So, don't rely on photo editing software for all your effects; get out there and have fun the traditional way with one of these three filters and discover how they can transform your images. What's your favorite lens filter to travel with? Is it one listed above or something different? I'd love to hear from you! Happy Snapping! Kirsten |

|
Hi there! I'm a portrait photographer currently based in Oahu, Hawaii. I specialize in family, pet & professional portraits. Thank you so much for coming to visit me here!
|
Some of the links on this website are affiliate links, which means that I may earn a commission if you click on the link or make a purchase using the link. When you make a purchase, the price you pay will be the same whether you use the affiliate link or go directly to the vendor's website using a non-affiliate link. By using the affiliate links, you are helping support Kirsten A. Harr Photography, and I genuinely appreciate your support.

|